Configuring Arturia MiniLab Mk II for use with Akai MPC Beats
by Glenn Meader
gmeader@chromakinetics.com
When you setup Akai MPC Beats to use the Arturia MiniLab Mk II MIDI controller, MPC Beats expects the controller to send a specific set of MIDI commands for Pads and Encoders (QLinks in MPC parlance).
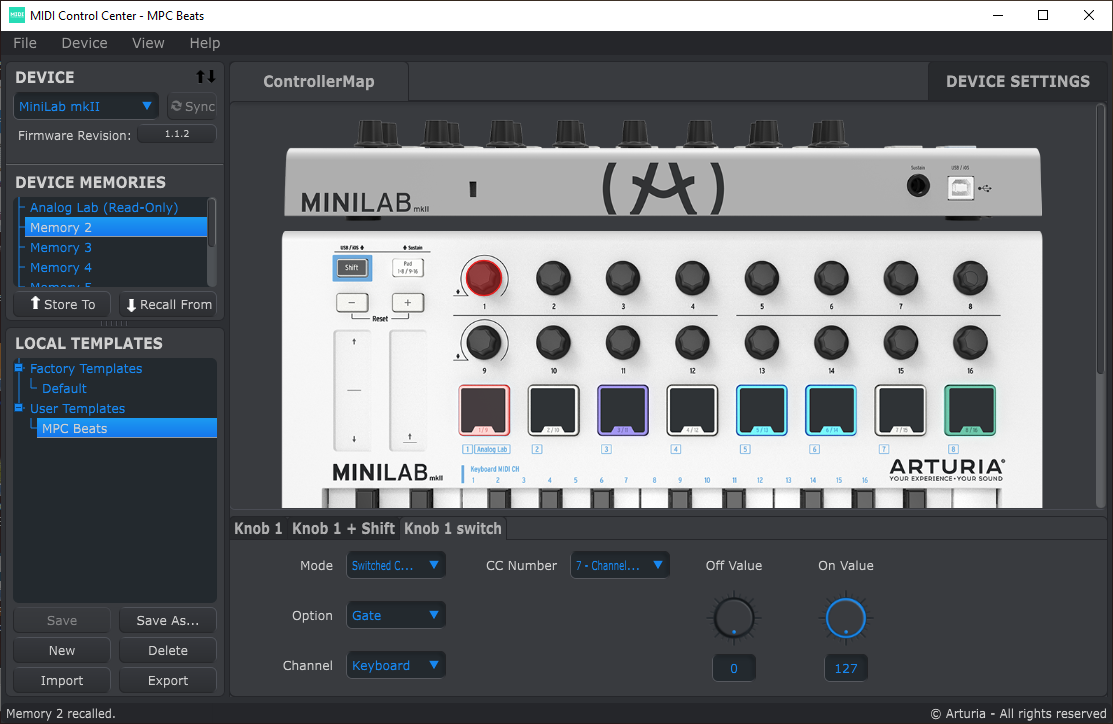
Neither of the MiniLab Mk II factory memory settings (Analog Lab or Ableton) configure the MiniLab Mk II properly for use with MPC Beats.So you have to configure one of the user memories to match what MPC Beats expects. I use memory 2.
You need to use the Arturia MIDI Control Center software to configure the MiniLab Mk II. That software is a free download from the Arturia website. I have installed firmware update 1.1.2 into my MiniLab Mk II; this improves how the knobs work.
Here are the settings MPC Beats expects when set to use an Arturia MiniLab Mk II:
Pads send MIDI notes on channel 10.
Arturia Pad Number | MIDI Note | MIDI Note Number |
1 | G#1 | 44 |
2 | A1 | 45 |
3 | A#1 | 46 |
4 | B1 | 47 |
5 | C2 | 48 |
6 | C#2 | 49 |
7 | D2 | 50 |
8 | D#2 | 51 |
9 | C1 | 36 |
10 | C#1 | 37 |
11 | D1 | 38 |
12 | D#1 | 39 |
13 | E1 | 40 |
14 | F1 | 41 |
15 | F#1 | 42 |
16 | G1 | 43 |
Knobs send CC messages on the Keyboard channel. Knobs need to be set to the CC number with Mode: Control, Option: Relative #2, Channel: Keyboard.
In MPC Beats, preferences > MIDI / Sync > Input Ports, make sure "Control" is enabled. The definition of this function is "Enable Control to receive MIDI from this device”.
Arturia Knob Number | CC number | MPC Q-LInk Number |
1 | 112 | 9 |
2 | 74 | 10 |
3 | 71 | 11 |
4 | 76 | 12 |
5 | 77 | 13 |
6 | 93 | 14 |
7 | 73 | 15 |
8 | 75 | 16 |
9 | 114 | 1 |
10 | 18 | 2 |
11 | 19 | 3 |
12 | 16 | 4 |
13 | 17 | 5 |
14 | 91 | 6 |
15 | 79 | 7 |
16 | 72 | 8 |
Knob 1 Switch sends CC number 7 Mode: Switched Control, Option: Gate, Channel: Keyboard
Knob 9 Switch sends CC number 116 Mode: Switched Control, Option: Gate, Channel: Keyboard
There are two other MIDI messages that the MiniLab Mk II can send that MPC Beats currently ignores, but that might be assigned to something, so I configured those too.
Knob 1 + Shift is set to CC number 9, Mode: Control, Option: Relative #2, Channel: Keyboard
Knob 9 + Shift is set to CC number 119, Mode: Control, Option: Relative #2, Channel: Keyboard
We use a relative mode for encoders, because Absolute mode causes jumps from whatever level was already existing in a MPC Beats Q-Link. Relative mode just moves the Q-Link knob up or down, as you would expect
A Relative mode is used with encoders to send an increment or decrement CC message when the knob is turned clockwise or counter-clockwise, respectively. There are three Relative modes that the MiniLab Mk II knob can be configured to use. Relative #2 is the one that MPC Beats understands as Rel CC Offset.
The MiniLab Mk II Relative #2 mode sends two MIDI CC messages whenever you turn a knob. The first CC message sends a value of 0. That message seems to be ignored by MPC Beats. The second message contains a value that depends on which direction you turn a knob, and how fast you turn it.
Knob Direction | Slow | Medium | Fast |
Clockwise | 127 (0x7F) | 126 (0x7E) | 125 (0x7D) |
Counter-clockwise | 1 (0x01) | 2 (0x02) | 3 (0x03) |
MPC Beats Rel CC Offset interprets these commands as instructions to increase or decrease the QLink value a little or more, depending how fast you turn the knob.
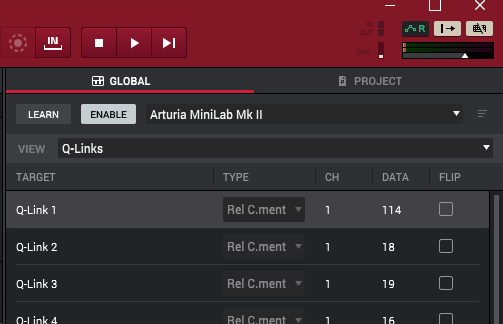
This is the MIDI Learn panel in MPC Beats, Viewing the Q-Links settings. Here you can see the TYPE is set to “Rel C.ment” which is short for Relative CC Offset. DATA is the MIDI CC number assigned to that Q-Link TARGET. CH is the MIDI channel number that MPC Beats is expecting to receive these CC messages on.